know about proxy Server
proxy Server
Advertisements
Overview
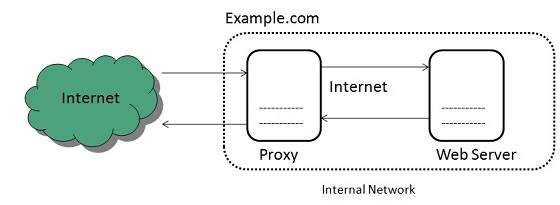
Proxy server is an intermediary server between client and the interner. Proxy servers offers the following basic functionalities:
- Firewall and network data filtering.
- Network connection sharing
- Data caching
Proxy servers allow to hide, conceal and make your network id anonymous by hiding your IP address.
Purpose of Proxy Servers
Following are the reasons to use proxy servers:
- Monitoring and Filtering
- Improving performance
- Translation
- Accessing services anonymously
- Security
Monitoring and Filtering
Proxy servers allow us to do several kind of filtering such as:
- Content Filtering
- Filttering encrypted data
- Bypass filters
- Logging and eavasdropping
Improving performance
It fasten the service by process of retrieving content from the cache which was saved when previous request was made by the client.
Transalation
It helps to customize the source site for local users by excluding source content or substituting source content with original local content. In this the traffic from the global users is routed to the source website through Translation proxy.
Accessing services anonymously
In this the destination server receives the request from the anonymzing proxy server and thus does not receive information about the end user.
Security
Since the proxy server hides the identity of the user hence it protects from spam and the hacker attacks.
Type of Proxies
Following table briefly describes the type of proxies:
Forward Proxies
In this the client requests its internal network server to forward to the internet.

Open Proxies
Open Proxies helps the clients to conceal their IP address while browsing the web.

Reverse Proxies
In this the requests are forwarded to one or more proxy servers and the response from the proxy server is retrieved as if it came directly from the original Server.

Architecture
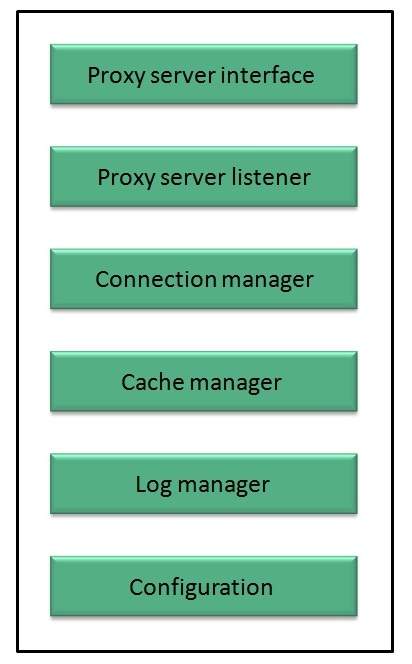
The proxy server architecture is divided into several modules as shown in the following diagram:

Proxy user interface
This module controls and manages the user interface and provides an easy to use graphical interface, window and a menu to the end user. This menu offers the following functionalities:
- Start proxy
- Stop proxy
- Exit
- Blocking URL
- Blocking client
- Manage log
- Manage cache
- Modify configuration
Proxy server listener
It is the port where new request from the client browser is listened. This module also performs blocking of clients from the list given by the user.
Connection Manager
It contains the main functionality of the proxy server. It performs the following functions:
- It contains the main functionality of the proxy server. It performs the following functions:
- Read request from header of the client.
- Parse the URL and determine whether the URL is blocked or not.
- Generate connection to the web server.
- Read the reply from the web server.
- If no copy of page is found in the cache then download the page from web server else will check its last modified date from the reply header and accordingly will read from the cache or server from the web.
- Then it will also check whether caching is allowed or not and accordingly will cache the page.
Cache Manager
This module is responsible for storing, deleting, clearing and searching of web pages in the cache.
Log Manager
This module is responsible for viewing, clearing and updating the logs.
Configuration
This module helps to create configuration settings which in turn let other modules to perform desired configurations such as caching.

Comments
Post a Comment